Battery switch on travel trailer function is crucial for managing your RV’s power. Understanding how your battery switch works is key to preventing electrical problems and ensuring a smooth camping experience. This guide will walk you through the different types of switches, their locations, troubleshooting tips, maintenance, and how they integrate with your trailer’s electrical system. We’ll cover everything from simple disconnect switches to more complex setups, ensuring you’re comfortable managing your RV’s power.
We’ll explore the various types of battery switches, their pros and cons, and best practices for installation and maintenance. Knowing how to locate, troubleshoot, and maintain your battery switch will save you headaches (and potentially a lot of money) down the road. We’ll also discuss safety precautions and how to integrate your battery switch with other electrical components in your RV.
Battery Switch Types in Travel Trailers: Battery Switch On Travel Trailer Function
Choosing the right battery switch for your travel trailer is crucial for managing your power system efficiently and safely. Understanding the different types available and their functionalities will help you make an informed decision. This section will Artikel the common types, their operations, and their respective advantages and disadvantages.
Battery Switch Types
Travel trailers utilize various battery switch types to control the flow of power from your batteries to the trailer’s electrical system. The most common types are the 1-2-Both switch and the disconnect switch. Understanding their differences is essential for proper operation and maintenance.
1-2-Both Battery Switch
The 1-2-Both switch is a three-position switch that allows you to select which battery bank (or both) powers your trailer. The “1” position connects only the first battery bank (typically the house battery), the “2” position connects only the second battery bank (often a starting battery for the tow vehicle), and the “Both” position connects both banks in parallel.
This setup is beneficial for those who want to isolate battery banks to prevent draining one while the other is being used.This switch is relatively simple to operate. Simply turn the switch to the desired position. However, it’s crucial to ensure the switch is in the correct position before operating any appliances or starting your tow vehicle to avoid unexpected power issues.
So, you’re planning a trip? Awesome! First things first: get travel insurance. Check out Aon travel insurance for solid coverage. Then, if you’re towing a travel trailer, knowing the battery switch on travel trailer function is crucial. This ensures your fridge stays cold and your lights stay on, making your adventure much smoother.
Don’t forget to check both before you hit the road!
Disconnect Switch
A disconnect switch is a simple on/off switch that completely isolates the battery from the trailer’s electrical system. This switch is primarily used for safety, preventing accidental discharge or short circuits. It’s often used in conjunction with other switches to provide a complete power cut-off.Operating a disconnect switch is straightforward: simply turn the switch to the “off” position to disconnect the battery.
So, you’re planning a trip? Awesome! First things first: get travel insurance. Check out Aon travel insurance for some solid options. They’ve got you covered for a lot of things, from lost luggage to medical emergencies. Once you’ve sorted that, think about your travel setup.
If you’re taking a travel trailer, understanding the battery switch on travel trailer function is crucial for keeping your lights on and fridge cold. It’s a simple thing, but knowing how it works can save you a lot of hassle!
This is crucial for long-term storage to prevent battery drain and to ensure safety during maintenance.
Comparison of Battery Switch Types
The following table summarizes the key features and considerations for each type of battery switch:
| Feature | 1-2-Both Switch | Disconnect Switch |
|---|---|---|
| Purpose | Selects which battery bank(s) power the trailer | Completely isolates the battery from the system |
| Positions | Three (1, 2, Both) | Two (On, Off) |
| Complexity | More complex | Simple |
| Advantages | Flexibility in power management, allows independent use of battery banks | Enhanced safety, prevents accidental discharge, simplifies maintenance |
| Disadvantages | More points of potential failure, slightly more expensive | Less flexible, doesn’t allow for selective battery usage |
Troubleshooting Common Battery Switch Problems

Your travel trailer’s battery switch is a crucial component, responsible for controlling the flow of power to your house batteries. When it malfunctions, you’ll be left without lights, appliances, or the ability to charge your batteries. Understanding common problems and how to troubleshoot them can save you frustration and potential damage.Common problems with travel trailer battery switches often stem from simple issues that are easily resolved with a bit of know-how and the right tools.
These problems usually involve corrosion, loose connections, or a complete switch failure. Let’s explore how to diagnose and fix these issues.
Battery Switch Corrosion
Corrosion on battery switch terminals is a frequent culprit behind malfunctioning switches. The build-up of corrosion creates resistance, preventing a proper electrical connection and leading to reduced power or a complete power outage. This corrosion often appears as a white, green, or blue powdery substance on the terminals and connecting wires. Severe corrosion can even cause the terminals to become fused together.
Troubleshooting Steps for a Non-Functioning Battery Switch
Before you start, always disconnect the negative (-) battery cable to prevent accidental short circuits. Safety first!
- Visual Inspection: Carefully examine the battery switch and its connections. Look for signs of corrosion, loose wires, or any physical damage to the switch itself. Check both the battery terminals and the wires connected to the switch.
- Check Connections: Tighten any loose connections on the battery switch terminals and the wires connected to the switch. Use the appropriate wrench size to avoid damaging the terminals. A firm connection is essential for proper electrical flow.
- Test for Continuity: If you have a multimeter, check the continuity of the switch itself. This confirms whether the switch is electrically functioning correctly. Place the multimeter probes on the input and output terminals of the switch; a closed circuit should show a reading of near zero ohms. A high reading, or an open circuit, indicates a faulty switch.
- Clean Corroded Terminals: If you find corrosion, clean the terminals thoroughly using a wire brush or sandpaper. For stubborn corrosion, a baking soda and water paste can be effective. Apply the paste, let it sit for a few minutes, then scrub with a brush. Rinse thoroughly with clean water and allow to dry completely before reconnecting.
- Replace the Switch (if necessary): If the switch is damaged beyond repair, or if cleaning and tightening connections don’t solve the problem, you’ll need to replace the battery switch. Ensure the replacement switch has the same amperage rating as the original.
Cleaning Corroded Battery Switch Terminals
Cleaning corroded terminals is crucial for restoring proper electrical conductivity. Never use harsh chemicals; a simple wire brush, sandpaper, or baking soda paste is sufficient. Always ensure the terminals and surrounding area are completely dry before reconnecting the wires and battery cables. After cleaning, applying a small amount of dielectric grease to the terminals can help prevent future corrosion.
This grease acts as a barrier against moisture and other contaminants. Remember to reconnect the negative (-) cable last.
Battery Switch and Electrical System Integration
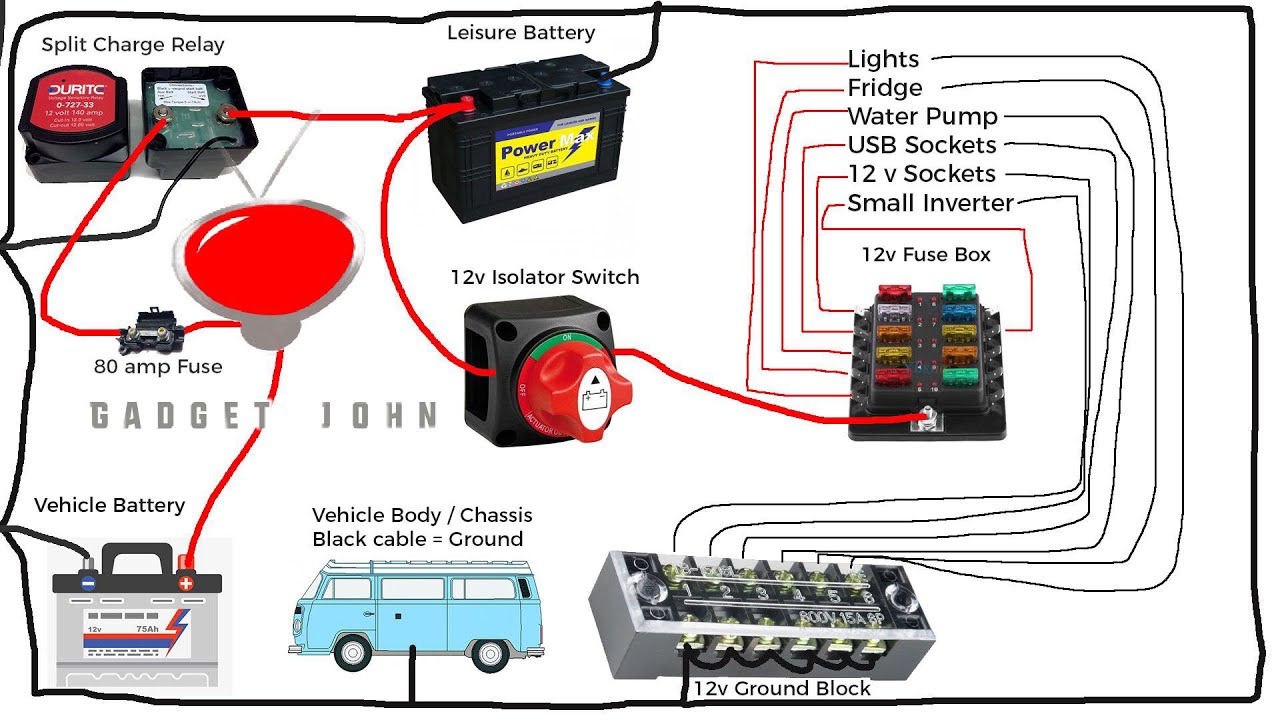
Your travel trailer’s battery switch is more than just an on/off switch; it’s a crucial component that manages the flow of power throughout your electrical system. Understanding its interaction with other parts is key to efficient and safe operation. This section details how the battery switch integrates with your trailer’s electrical system, impacting power distribution and overall functionality.The battery switch acts as the central control point for your trailer’s DC power.
It dictates whether power from your house batteries flows to the various DC circuits in your RV. These circuits power lights, water pumps, refrigerators (if DC), and other appliances. When the switch is in the “off” position, it completely isolates the batteries, preventing accidental discharge or short circuits. In the “on” position, it allows power to flow, powering your DC-powered systems.
The interaction with other systems, like the charger and inverter, is crucial for managing the power sources effectively.
Power Flow Management Through the Battery Switch
The battery switch’s primary role is to control the flow of power from the house batteries to the various DC circuits within the travel trailer. When the switch is “on,” a path is created allowing current to flow from the batteries to the loads. This path includes fuses or circuit breakers for protection against overloads. A typical setup involves the batteries connected to the switch, then the switch connected to a distribution panel, which then feeds the individual circuits.
If the switch is “off,” the path is broken, preventing any power from reaching the loads, regardless of the status of the charger or inverter.
Interaction with Other Electrical Components
The battery switch works in conjunction with other electrical components, such as the battery charger, inverter, and shore power connection. The battery charger replenishes the house batteries, usually via shore power or alternator charging. The battery switch allows the charger to access and charge the batteries only when it is “on.” The inverter converts DC power from the batteries to AC power, supplying AC-powered appliances.
The battery switch controls whether the inverter can draw power from the batteries. Shore power, typically 120VAC, provides external power to the trailer. The battery switch is usually independent of shore power; however, many trailers have a dedicated circuit breaker that protects the shore power lines. A faulty switch can impact all of these systems.
Comparison with Other Power Management Devices, Battery switch on travel trailer function
While the battery switch is a fundamental component, other devices further refine power management. Solar charge controllers regulate power from solar panels, preventing overcharging of the batteries. Battery monitors display the battery’s state of charge, providing information for better power management. These devices work in conjunction with the battery switch; the switch still controls the primary power flow, while other devices optimize charging and usage.
For example, a solar charge controller will regulate the charging current from the solar panels, but the battery switch will determine whether that charge current is allowed to reach the batteries.
Power Flow Diagram
Imagine a simple diagram: Three boxes represent the house batteries, the battery switch, and a distribution panel. Arrows represent the flow of power.[Descriptive Text: An arrow points from the house batteries to the battery switch. Another arrow, only active when the switch is “on,” points from the switch to the distribution panel. From the distribution panel, several smaller arrows branch out to various loads (lights, pumps, etc.).
A separate arrow connects the battery charger to the batteries; this arrow is unaffected by the battery switch’s “on” or “off” state, though the charger will only charge the batteries when the switch is “on” allowing the charger to have a path to the batteries.]
Mastering your travel trailer’s battery switch is a fundamental skill for any RVer. By understanding its function, performing regular maintenance, and knowing how to troubleshoot common problems, you’ll ensure a reliable power supply for all your adventures. Remember, proper care of your battery switch can prevent costly repairs and keep your camping trips running smoothly. So, get out there, explore, and enjoy the open road with confidence!
FAQs
What happens if my battery switch is left in the “off” position?
Leaving the switch off completely disconnects the house batteries from the rest of the electrical system. This prevents battery drain but means you’ll have no power to your appliances or lights.
How often should I clean my battery switch terminals?
At least once a year, or more frequently if you notice corrosion. Spring and fall are good times to check.
Can I use a different type of battery switch than what came with my trailer?
Potentially, but it’s best to consult with an RV electrician or experienced RVer to ensure compatibility with your trailer’s existing wiring and amperage requirements.
What should I do if my battery switch feels stiff or difficult to operate?
Try lubricating the switch mechanism with a suitable lubricant (consult your owner’s manual). If the problem persists, it might indicate a problem requiring professional attention.
